Merry Christmas!!
We hope you are enjoying a day of Joy with friends and family!
Debi
Sunday, December 25, 2016
Saturday, November 5, 2016
CTMH Paper Blog Hop - City Sidewalks
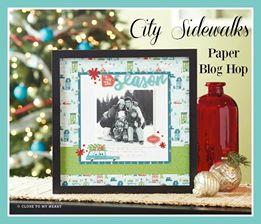
Welcome to our CTMH Paper Blog Hop with City Sidewalks Paper! This Hop is a circle of FUN ideas and inspiration with The Heartfelt Sentiments Team.
If you are coming from Anna's Blog, you are on the right track. We hope you are getting a lot of great ideas for this FUN paper pack!
I wanted to make this little book and this paper pack was PERFECT!! I also used the Pretty Poinsettia (B1540) Stamp Set and Cranberry Stamp Pad:

But wait...there's more! This little book makes a great gift too! With a fun little lip gloss inside it makes a great gift for teachers, Sunday school, sisters, friends, anyone really! It's small enough to make several out of one sheet of cardstock and one sheet of paper too, that's always awesome.


SO FUN. I really like this little gift book and it's just a little something that is different than candy!
This is the last stop on the Hop, however, if you didn't start at the begining or wish to continue back through...visit Melissa's Blog.
Directions for this little beauty will be posted soon! So check back again.
Debi
Monday, September 5, 2016
CTMH Paper Blog Hop - Jeepers Creepers

Welcome to our Jeepers Creepers Blog Hop! If you came from Katy's Blog, you are on the right track. We hope you enjoyed all the creative goodness everyone had to share this month!
The Jeepers Creepers paper pack is SO FUN! I'm not that big on Halloween but this paper can be used for SO many other things too! That being said...I just love the spooky eyes paper! I just had to use it on a card!
My card uses the Spooky eyes paper cut at 5 1/2 x 4 1/4" (be sure to watch the direction of the eyes when cutting the paper). Adhere this piece to the front of a White Daisy card base.
Next cut a piece of Pansy Cardstock at 4 1/2 x 3 1/4" and adhere to center of card front.
Cut a piece of White Daisy Cardstock at 4 1/4 x 3" and before adhere to card front add your compliment stickers...
I cut the striped border in half and placed about a 1/4" from the top edge and bottom edges
Place the little monster sticker in the middle and adhere the White Daisy piece to center of card front.
Add Puffy Eye stickers on top of the little monsters eyes.
Embellish inside of card and envelope as desired.
Here's my card front:

You can see here where I added the dimensional eyes:

Suggested inside message:
'I See'...
You're having a Birthday!
You're doing a great job!
It's time to Celebrate!
There are lots of sayings you can use, just think about what you are celebrating! I hope you like this little project and that you can see this set is Fabulous for Fun projects other than Halloween! I think the little monsters stamp set is awesome for young boys birthdays!
Here are the products I used:
G1110 Workshop Your Way Jeepers Creepers (includes the pattern paper, Compliment Assortment (with Stickers), Cardstock and Assortment pack (puffy stickers)
X254 White Value Pack Cards and Envelopes
Be sure to check out the matching Thin Cuts and Stamp Bundle as well as new ink colors!
If you already have a consultant please shop with them. If you do not have a consultant I would be happy to help you and earn your business. To order with me click here and choose September Orders. Let me know if you have any questions!
To go to the beginning of the blog hop or to continue on your journey, go to Melissa's blog
Until next time, Create it with Heart.
Debi
Tuesday, April 5, 2016
Regatta Blog Hop

Welcome to the Regatta Paper Pack Blog Hop! So excited you joined us!
If you came here from Melissa David's blog then you are on the right track.
This card is totally simple and not what I started out to make, but the little boat is so dang cute and the technique is fun! I hope you like it too, let's get started:
I took a white card base and cut my 'wave' B&T (Background & Texture paper) 1 3/4" x 5 1/2" and use it to guide you in your placement of your sun.
To make the sun with 'Rays', I got a small piece of scratch cardstock and using the waves paper to help me with the height of where to start my sun, I chose a place where all the 'Rays' will stem from. Then all you do is place the scrap cardstock at an angle and sponge Canary ink along the scratch paper (by dragging it along the scratch cardstock) all the way to edge of the card, then move the scratch cardstock (pivoting around from where the Rays will stem from) a bit (depending on how far you want your 'rays' spread out) and keep going until all the sun rays are done. See pictures below and hopefully they will help make this more clear.


After the sun is complete, stamp the sentiment in Saphire ink in upper right corner. Adhere wave B&T to bottom of card.

I then cut out a little sailboat from the 'sailboat' B&T in the paper pack and set aside.
Next, cut out the long wave with the Thin Cut from Saphire cardstock on the embossing machine and adhered it to the top of the 'wave' B&T with the little boat barely behind the waves on the left side of the card.


Simple and fun! I hope you enjoy this one also!The supplies are listed below. This the last stop on the hop, if you started here or want to go back to the beginning click Here.
X7206B Regatta Paper Packet
C1642 My Anchor
Z3202 My Anchor Thin Cuts
Z2648 Sapphire Exclusive Stamp Pad
Z1836 Non-Stick Micro Tip Scissors
Z553 Bonding Memories Glue Pen
Z3022 3L E-Z Dots Adhesive
You can place an order with your consultant or visi my website at: www.CreatedWithHeart.ctmh.com and go Shop!
Thanks for joining us today and have a great week!
Debi
Friday, February 19, 2016
CLEARLY a great reminder for the Planner
For those of you who have already purchased the Planner Close To My Heart came out with in December (and those of you still thinking about it...what are you waiting for? It''s AWESOME!), I have an idea to show you!
If you purchased the PML (Picture My Life cards) last month that were on special, these are what I used here. If you didn't get the PML cards last month, we still have a lot of different themes to choose from in our Annual Idea book!
First I took a piece of Overhead Projector sheets and I punched the 3 holes on the left side to fit into the planner and on the right edge I decided to put Washi Tape (this particular one was retired last year...great time to use up items you have on hand or we have several FUN patterns to choose from in our current stock).

Then I taped two cards, one with just a pattern (no quotes or pictures) on the bottom and another with a great quote on top of it, in the middle of the Acetate.


Thanks for looking!
Have a great Day!
Until next time, Create it with Heart,
Debi
If you would like to order your planner check it out Here.
If you would like to shop my Close To My Heart Store (be sure to click the 'join' button for March orders to earn FREE product with your order, unless you are ordering more than $150, in this case do not join the March orders as you will automatically earn FREE products) go Here.
Remember the Special Stamp of the Month Here.
Also, our special Share the Love stamp set to help families in need Here!
As always each order receives a little Thank You gift package from me!
If you purchased the PML (Picture My Life cards) last month that were on special, these are what I used here. If you didn't get the PML cards last month, we still have a lot of different themes to choose from in our Annual Idea book!
First I took a piece of Overhead Projector sheets and I punched the 3 holes on the left side to fit into the planner and on the right edge I decided to put Washi Tape (this particular one was retired last year...great time to use up items you have on hand or we have several FUN patterns to choose from in our current stock).

Then I taped two cards, one with just a pattern (no quotes or pictures) on the bottom and another with a great quote on top of it, in the middle of the Acetate.


This way I have a cute quote to remind me to do my 'to do' items and I have another card underneath (you can see it sticking out at the bottom and the left side...that's to remind me to look at what's under there! lol, I think it's cute too!) to put my 'rolling' or long term To Do list...so I remember to add them to my calendar but I don't need to keep them in my head!

Then I just put it in my planner and move it ahead every couple of weeks so I remember to look at it once in a while. lol

You can see here that it is a little shorter than my planner pages...I didn't do this intentionally (my piece of acetate was just that size and I just went with it since the PML cards fit on it just fine), however, I think I like it being a little shorter (you can choose the size you like for yours!)...I don't pass it over when I get to it...so it's doing it's job so far! When I get this card full and all marked off, I can add another one under there and start all over!
Thanks for looking!
Have a great Day!
Until next time, Create it with Heart,
Debi
If you would like to order your planner check it out Here.
If you would like to shop my Close To My Heart Store (be sure to click the 'join' button for March orders to earn FREE product with your order, unless you are ordering more than $150, in this case do not join the March orders as you will automatically earn FREE products) go Here.
Remember the Special Stamp of the Month Here.
Also, our special Share the Love stamp set to help families in need Here!
As always each order receives a little Thank You gift package from me!
Thursday, February 18, 2016
Share the Love!
Isn't this a great name for this set!?!
This stamp set is clearly a special one. Not only is it a great stamp set to have for those awesome cards you make...it will also help families in need!! For each purchased stamp set, Close To My Heart will donate $7.00 (WOW!) to the charity we support, Operation Smile. This charity pays for the operations that are needed for kids who were born with a Cleft Palate (a split in the roof of the mouth that some people are born with) and whose parents could otherwise not afford to pay for the operation to help their child.
As many of you know this charity is Close to my Heart as we have a family member who was born with a cleft palate, so I know first hand that this is a difficult time for the Mother, the Child and the family and especially difficult if they can not even begin to think about the needed surgery because of the money it costs.
Take a look at the stamp set and see if this is something you would like to add to your stamp collection:

Let me know what you think by leaving a message below! Check back soon and I will be posting some pictures of cards created with this set at the end of the week and next week!
Thanks for looking! Have a great day!
Until next time, Create it with Heart,
Debi
To order this stamp set or to see the entire set click HERE!
Thursday, January 7, 2016
National Papercrafting Month, Live Your Day special

Celebrate National Papercrafting Month with this exclusive Piccture My Life, Live Your Day scrapbooking program - available this month only! This set was designed to coordinate perfectly with the sensational Everday Life Planner collection. These cards make it easy to preserve your everday moments all year long whether you use them in the planner or on thier own. Get yours Today for only $8.95 before this offer is gone!
SO many FUN uses for these cards! I have been using them in my Planner (have you got yours yet?). I will be sharing ideas throughout the month on how to use these beautiful cards.
Here is an idea:
Take one of the beautiful blank cards and using washi tape, tape it to the front of a Divider in the planner system:


Then you can put any list you want to on it, reminders for the year or even quotes that you like! (I did rotate the arrow washi tape picture, not sure what it's problem is but you can see how Fun it is!)
To get this special National Papercrafting set click Here
and be sure to Join the 'January 2016 Orders' if your order is less
than $150.00 and you will be included in the FREE gifts! (orders over
$150 will automatically get the FREE gifts, so do not join the party.)
All orders will receive my special Thank You gift package.Check back soon for more great ideas and Remember to Create it from your Heart,
Debi
Tuesday, January 5, 2016
Beloved Bouquet
Create Beautiful bouquets with this beautiful stamp set! Ts is a Base and Shade (or Two-Step) stamp set that allows for a lot of different techniques. We will be visiting lots of FUN projects this month with this stamp set which is only available January 1, 2016 thru January 31, 2016.


Each month you can purchase a new D-size stamp set, available for that month only, for just $5! When you place an order of $50 or more in Close To My Heart products, you qualify for this special Stamp of the Month pricing.
The Stamp of the Month set is also available at it's Full price of $17.95 without a qualifying order.
To get this special Stamp of The Month click Here and be sure to Join the 'January 2016 Orders' if your order is less than $150.00 and you will be included in the FREE gifts! (orders over $150 will automatically get the FREE gifts, so do not join the party.) All orders will receive my special Thank You gift package.
Remember to Create it from your Heart,
Debi
Monday, January 4, 2016
New Year means New Products!
A New Year means NEW Close To My Heart products! Here is the cover of the New Expressions 1 catalog that will be available to order from January 1, 2018 thru the end of April 2016:

To see all the pages just click Here and you can view each page of goodness!! You can also view the Annual Inspirations if you haven't already received one.
You can get an Expressions catalog FREE with any order on my site! When you check you cart scroll down to the bottom and click the button to add it for FREE!
SO many FUN new things to play with!! Check back in the days to come to see more NEW items and FUN projects that I've been working on.
Until next time, Create it from the Heart,
Debi
Friday, January 1, 2016
2016
Hi Friends,
I hope 2016 brings Peace, Joy and a Lot of Fun and Special Moments with Family and Friends for you.
Remember to Create it With Heart!
Debi
Happy New Year!
I hope 2016 brings Peace, Joy and a Lot of Fun and Special Moments with Family and Friends for you.
Remember to Create it With Heart!
Debi
Subscribe to:
Posts (Atom)
Thank You cards
Thank You! Here is a card that I have been sending to those who have shopped with me recently. It has a fun little technique that is SO easy...
-
 This month we are highlighting the Nevermore paper packet from the NEW Holiday Seasonal Expressions catalog! If you don't have a cop...
 -
August SOTM - For the Love of Crafting Thank you for joining us on this Blog Hop with lots of great ideas for you to use with your New ...
-
 Magically Masked - CTMH Technique Blog Hop Thank you for joining us on this Blog Hop with lots of Masking ideas and tips for you......
